How to Restore Android9 OS to the eMMC on PN8M-090T
From ICOP tech wiki
How to Restore Android9 OS to the eMMC on PN8M-090T
Contents
Restore the Android9 OS via Linux host PC to the PN8M-090T
Tools you need before restoring the image to the eMMC:
- Recovery image with the UUU burning software:
ftp://ppc:ppc@ftp.icop.com.tw/PN8M/PN8M-090T/OS/Android_9/PN8M-090T-Android-EETI.zip
- A 64-bit Linux host O/S on a PC (The virtual machine is not suggested to be used)
- USB cable CABLE-MINIDIN8P-30 to connect between the host PC and the PN8M-090T.
Write the image to the eMMC on the PN8M-090T.
This section will introduce how to write the image to the eMMC on the PN8M-090T step by step.
- Find the SW1 and SW2 on the PN8M-090T and change the setting to Serial Download(developer) Mode according to the photo below:

- Turn on the host PC and unzip the image file in it.
- Connect the USB on CABLE-MINIDIN8P-30 to the host PC, but not connect to the PN8M-090T.

- Open a terminal on the host PC and access the location you’ve put the image file and input “sudo ./ uuu_imx_android_flash.sh –f imx8mm” ; you will see “Wait for known USB Device Appear”.

- Connect the CABLE-MINIDIN8P-30 to the PN8M-090T, and it will trigger the serial download mode to restore the image from the host PC.

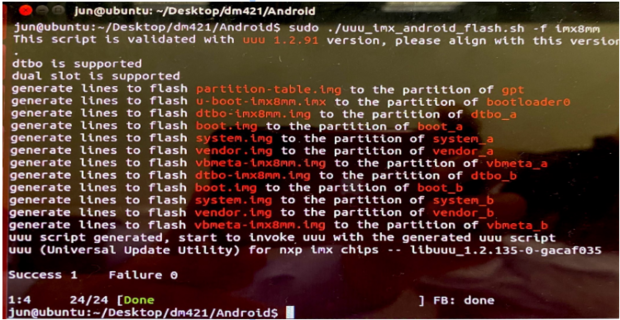
- After the restore process is done, it will show on the host PC as the image below.
- Remove the CABLE-MINIDIN8P-30 on the PN8M-090T, and set the SW1 and SW2 as the photo below


- Power on the PN8M-090T and you can see the Android9 booting.
Restore the Android9 OS via Win10 host PC to the PN8M-090T
Tools you need before restoring the image to the eMMC:
- Recovery image with the UUU burning software:
Ftp://ppc:ppc%40ftp.icop.com.tw/PN8M/PN8M-090T/OS/Android%209/PN8M-090T-Android-EETI.zip
- A Windows 10 host O/S on a PC (The virtual machine is not suggested to be used)
- USB cable CABLE-MINIDIN8P-30 to connect between the host PC and the PN8M-090T.
Write the image to the eMMC on the PN8M-090T.
This section will introduce how to write the image to the eMMC on the PN8M-090T step by step.
- Find the SW1 and SW2 on the PN8M-090T and change the setting to Serial Download(developer) Mode according to the photo below:
- Turn on the host PC and unzip the image file to it.
- Connect the USB on CABLE-MINIDIN8P-30 to the host PC, but not connect to the PN8M-090T.
- Open a terminal with administration right on the host PC and access the location you’ve put the image file and input “uuu_imx_android_flash.bat -f imx8mm -a -e” , and you will see “Wait for known USB Device Appear”.

- Connect the CABLE-MINIDIN8P-30 to the PN8M-090T, and it will trigger the serial download mode to restore the image from the host PC.
- After the restore process is done, it will show on the host PC as the image below:

- Remove the CABLE-MINIDIN8P-30 on the PN8M-090T, and set the SW1 and SW2 as the photo below

- Power on the PN8M-090T and you can see the Yocto Linux booting.