Difference between revisions of "How to Restore Android9 OS to the eMMC on EBOX-IMX8MM"
From ICOP tech wiki
Eveshih0725 (talk | contribs) (How to Restore Android9 OS to the eMMC on EBOX-IMX8MM) |
Eveshih0725 (talk | contribs) |
||
| Line 1: | Line 1: | ||
| − | How to Restore Android9 OS to the eMMC on | + | {{#vardefine:RELEASE_PARAM|{{#urlget:release}}}} <!-- |
| − | EBOX-IMX8MM | + | --> {{#lst:Yocto_Platform_Customization|{{#var:RELEASE_PARAM|RELEASE_MORTY_V1.0_DART-6UL}}}} <!-- |
| + | --> {{PageHeader|How to Restore Android9 OS to the eMMC on | ||
| + | EBOX-IMX8MM|Contents=1.Restore the Android9 OS via Linux host PC to the EBOX-IMX8MM | ||
| + | 2.Restore the Android9 OS via Win10 host PC to the EBOX-IMX8MM}} {{DocImage|category1={{#var:HARDWARE_NAME}}|category2=Yocto|}} | ||
| + | __toc__ | ||
| + | <br /> | ||
| − | + | {{:Recovery_SD_card_general}} | |
| − | |||
| − | |||
| − | + | ==Restore the Yocto Linux via Win10 host PC to the EBOX-IMX8MM== | |
| − | |||
| − | |||
| − | |||
| − | |||
| − | |||
| − | |||
| − | |||
| − | |||
| − | |||
| − | |||
| − | |||
| − | |||
| − | + | ===Tools you need before restoring the image to the eMMC:=== | |
| − | |||
| − | + | *Recovery image with the UUU burning software: | |
| + | **1GB RAM version: <br />ftp://sbc:sbc@ftp.icop.com.tw/iMX8/OS/Yocto/Demo%20image/EB-IMX8MM1G.zip | ||
| + | **2GB RAM version: <br />ftp://sbc:sbc@ftp.icop.com.tw/iMX8/OS/Yocto/Demo%20image/EB-IMX8MM2G.zip | ||
| − | + | A Windows 10 host O/S on a PC (The virtual machine is not suggested to be used) | |
| − | |||
| − | + | *USB cable to connect between the host PC and EBOX-IMX8MM. | |
| − | |||
| − | |||
| − | |||
| − | |||
| − | |||
| − | |||
(Ex: USB to micro USB) | (Ex: USB to micro USB) | ||
| − | + | *Cable for the console to connect between the host PC and the EBOX-IMX8MM. | |
| − | |||
| − | |||
| − | |||
| − | |||
| − | |||
| + | (Ex: USB to RS-232) | ||
| + | ===Write the image to the eMMC on the EBOX-IMX8MM.=== | ||
| + | This section will introduce how to write the image to the eMMC on the EBOX-IMX8MM step by step. | ||
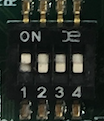
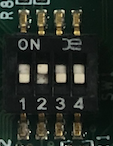
| − | + | *Find the SW1 on the EBOX-IMX8MM and change the setting to Serial Download Mode according to the photo below: <br />[[File:1-2-2.png|frameless]] | |
| − | + | *Turn on the host PC and unzip the image file to it. | |
| − | + | *Connect the host PC and the EBOX-IMX8MM via console cable. (In this case, the console function on the EBOX-IMX8MM is on COM2.) | |
| − | + | *Connect the USB to micro USB cable to the host PC, but not connect to EBOX-IMX8MM. | |
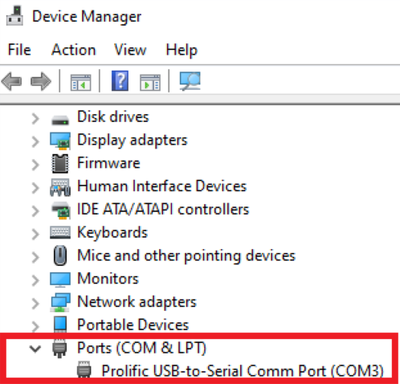
| − | + | *Open the PUTTY on the host PC and set the Serial line at the correct location. You could find the location under device manager. <br />[[File:2-2-5-1.png|frameless|400x400px]][[File:2-2-5-2.png|frameless|400x400px]] <br />If there is no PUTTY on the host PC, please download it on the PUTTY’s website: https://www.putty.org/ | |
| − | + | *After connected to the PUTTY, you could monitor the restore process on the EBOX-IMX8MM. | |
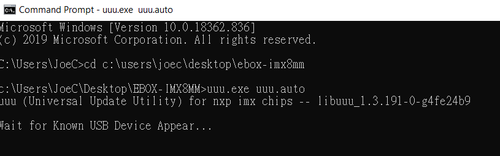
| − | + | *Open a terminal on the host PC and access the location you’ve put the image file and input “uuu.exe uuu.auto” , and you will see “Wait for known USB Device Appear”. <br />[[File:2-2-7.png|frameless|500x500px]] | |
| − | + | *Connect the Micro USB to the EBOX-IMX8MM, and it will trigger the serial download mode to restore the image from the host PC. | |
| − | + | *After the restore process is done, it will show on the host PC as the image below: <br />[[File:2-2-9.png|frameless|500x500px]] | |
| − | + | *Remove the USB to Micro USB cable on the EBOX-IMX8MM (Power off), and set the SW1 to Internal boot as below. <br />[[File:1-2-10.png|frameless]] | |
| − | + | *Power on the EBOX-IMX8MM and you can see the Yocto Linux booting. <br />[[File:1-2-11.png|frameless|500x500px]] | |
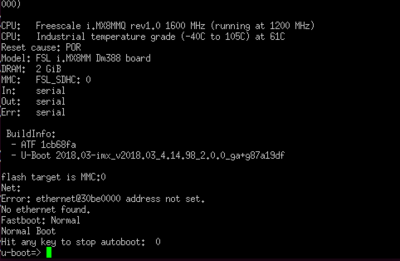
| − | + | *If you press any key while booting up, we will access the U-boot mode. <br />[[File:1-2-12.png|frameless|400x400px]] | |
| − | |||
| − | |||
| − | 2 | ||
| − | |||
| − | |||
| − | 2 | ||
| − | 2. | ||
Revision as of 10:15, 6 August 2020
How to Restore Android9 OS to the eMMC on EBOX-IMX8MM
Contents
Restore the Yocto Linux via Win10 host PC to the EBOX-IMX8MM
Tools you need before restoring the image to the eMMC:
- Recovery image with the UUU burning software:
A Windows 10 host O/S on a PC (The virtual machine is not suggested to be used)
- USB cable to connect between the host PC and EBOX-IMX8MM.
(Ex: USB to micro USB)
- Cable for the console to connect between the host PC and the EBOX-IMX8MM.
(Ex: USB to RS-232)
Write the image to the eMMC on the EBOX-IMX8MM.
This section will introduce how to write the image to the eMMC on the EBOX-IMX8MM step by step.
- Find the SW1 on the EBOX-IMX8MM and change the setting to Serial Download Mode according to the photo below:
- Turn on the host PC and unzip the image file to it.
- Connect the host PC and the EBOX-IMX8MM via console cable. (In this case, the console function on the EBOX-IMX8MM is on COM2.)
- Connect the USB to micro USB cable to the host PC, but not connect to EBOX-IMX8MM.
- Open the PUTTY on the host PC and set the Serial line at the correct location. You could find the location under device manager.
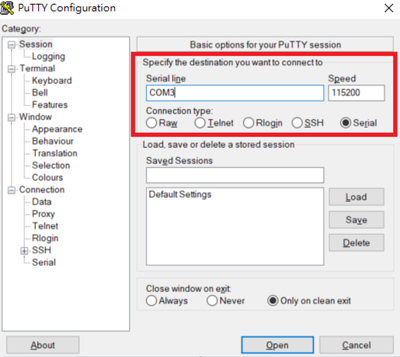
If there is no PUTTY on the host PC, please download it on the PUTTY’s website: https://www.putty.org/ - After connected to the PUTTY, you could monitor the restore process on the EBOX-IMX8MM.
- Open a terminal on the host PC and access the location you’ve put the image file and input “uuu.exe uuu.auto” , and you will see “Wait for known USB Device Appear”.
- Connect the Micro USB to the EBOX-IMX8MM, and it will trigger the serial download mode to restore the image from the host PC.
- After the restore process is done, it will show on the host PC as the image below:

- Remove the USB to Micro USB cable on the EBOX-IMX8MM (Power off), and set the SW1 to Internal boot as below.
- Power on the EBOX-IMX8MM and you can see the Yocto Linux booting.
- If you press any key while booting up, we will access the U-boot mode.