Difference between revisions of "How to Restore Yocto Linux to the eMMC on PN8M-090T"
From ICOP tech wiki
Eveshih0725 (talk | contribs) (Created page with "How to Restore Yocto Linux to the eMMC on PN8M-090T") |
Eveshih0725 (talk | contribs) |
||
| Line 1: | Line 1: | ||
| − | How to Restore Yocto Linux to the eMMC on PN8M-090T | + | {{#vardefine:RELEASE_PARAM|{{#urlget:release}}}} <!-- |
| + | --> {{#lst:Yocto_Platform_Customization|{{#var:RELEASE_PARAM|RELEASE_MORTY_V1.0_DART-6UL}}}} <!-- | ||
| + | --> {{PageHeader|How to Restore Yocto Linux to the eMMC on PN8M-090T}} {{DocImage|category1={{#var:HARDWARE_NAME}}|category2=Yocto|}} | ||
| + | |||
| + | __toc__ | ||
| + | |||
| + | ==Restore the Yocto Linux via Linux host PC to the EBOX-IMX8MM== | ||
| + | ===Tools you need before restoring the image to the eMMC:=== | ||
| + | |||
| + | *<u>Recovery image</u> with the <u>UUU burning software</u>: | ||
| + | **2GB RAM version: <br />ftp://ppc:ppc@ftp.icop.com.tw/PN8M/OS/YOCTO/Demo%20image/PN8M-090T-2G-YOCTO.zip] | ||
| + | |||
| + | *A 64-bit Linux host O/S on a PC (The virtual machine is not suggested to be used) | ||
| + | *USB cable CABLE-MINIDIN8P-30 to connect between the host PC and the PN8M-090T. | ||
| + | |||
| + | ===Write the image to the eMMC on the PN8M-090T=== | ||
| + | This section will introduce how to write the image to the eMMC on the PN8M-090T step by step. | ||
| + | |||
| + | *Find the SW1 and SW2 on the PN8M-090T and change the setting to Serial Download(developer) Mode according to the photo below: | ||
| + | |||
| + | [[File:Yocto-linux-1.2.1.png|frameless|420x420px]] | ||
| + | |||
| + | *Turn on the host PC and unzip the image file in it. | ||
| + | *Connect the USB on CABLE-MINIDIN8P-30 to the host PC, but not connect to the PN8M-090T. | ||
| + | |||
| + | [[File:Yocto-linux-1.2.3.png|frameless|300x300px]] | ||
| + | |||
| + | *Open a terminal on the host PC and access the location you’ve put the image file and input “sudo ./uuu uuu.auto” ; you will see “Wait for known USB Device Appear” | ||
| + | |||
| + | [[File:Yocto-1.2.5.png|frameless|680x680px]] | ||
| + | |||
| + | *Connect the CABLE-MINIDIN8P-30 to the PN8M-090T, and it will trigger the serial download mode to restore the image from the host PC. | ||
| + | |||
| + | [[File:Yocto-linux-1.2.5.png|frameless|560x560px]] | ||
| + | |||
| + | *After the restore process is done, it will show on the host PC as the image below: | ||
| + | |||
| + | [[File:Yocto-1.2.7.png|frameless|680x680px]] | ||
| + | |||
| + | *Remove the USB to Micro USB cable on the EBOX-IMX8MM (Power off), and set the SW1 to Internal boot as below. | ||
| + | |||
| + | [[File:Yocto-linux-1.2.7.png|frameless|460x460px]] | ||
| + | |||
| + | *Power on the EBOX-IMX8MM and you can see the Yocto Linux booting. | ||
| + | |||
| + | [[File:1-2-11.png|frameless|480x480px]] | ||
| + | |||
| + | *If you press any key while booting up, we will access the U-boot mode. | ||
| + | |||
| + | [[File:1-2-12.png|frameless|480x480px]] | ||
| + | |||
| + | <br /> | ||
| + | |||
| + | ==Restore the Yocto Linux via Win10 host PC to the PN8M-090T== | ||
| + | |||
| + | ===Tools you need before restoring the image to the eMMC:=== | ||
| + | |||
| + | *'''Recovery image''' with the '''UUU burning software''': | ||
| + | **2GB RAM version: | ||
| + | **<nowiki>ftp://ppc:ppc@ftp.icop.com.tw/PN8M/OS/YOCTO/Demo%20image/PN8M-090T-2G-YOCTO.zip</nowiki> | ||
| + | |||
| + | *A Windows 10 host O/S on a PC (The virtual machine is not suggested to be used) | ||
| + | *USB cable CABLE-MINIDIN8P-30 to connect between the host PC and the PN8M-090T. | ||
| + | |||
| + | ===Write the image to the eMMC on the EBOX-IMX8MM.=== | ||
| + | This section will introduce how to write the image to the eMMC on the EBOX-IMX8MM step by step. | ||
| + | |||
| + | *Find the SW1 and SW2 on the PN8M-090T and change the setting to Serial Download(developer) Mode according to the photo below: | ||
| + | |||
| + | [[File:Yocto-linux-1.2.1.png|frameless|420x420px]] | ||
| + | |||
| + | *Turn on the host PC and unzip the image file to it. | ||
| + | *Connect the USB on CABLE-MINIDIN8P-30 to the host PC, but not connect to the PN8M-090T. | ||
| + | |||
| + | [[File:Yocto-linux-1.2.3.png|frameless|300x300px]] | ||
| + | |||
| + | *Open a terminal on the host PC and access the location you’ve put the image file and input “uuu.exe uuu.auto” , and you will see “Wait for known USB Device Appear”. | ||
| + | |||
| + | [[File:Yocto-2.2.4.png|frameless|670x670px]] | ||
| + | |||
| + | *Connect the CABLE-MINIDIN8P-30 to the PN8M-090T, and it will trigger the serial download mode to restore the image from the host PC. | ||
| + | |||
| + | [[File:Yocto-linux-1.2.5.png|frameless|560x560px]] | ||
| + | |||
| + | *After the restore process is done, it will show on the host PC as the image below: | ||
| + | |||
| + | [[File:Yocto-2.2.6.png|frameless|690x690px]] | ||
| + | |||
| + | *Remove the CABLE-MINIDIN8P-30 on the PN8M-090T, and set the SW1 and SW2 as the photo below | ||
| + | |||
| + | [[File:Yocto-linux-1.2.7.png|frameless|460x460px]] | ||
| + | |||
| + | *Power on the EBOX-IMX8MM and you can see the Yocto Linux booting. | ||
| + | |||
| + | [[File:1-2-11.png|frameless|499x499px]] | ||
| + | |||
| + | *If you press any key while booting up, we will access the U-boot mode.[[File:Yocto-2.2.9.png|frameless|482x482px]] | ||
Revision as of 11:05, 7 August 2020
How to Restore Yocto Linux to the eMMC on PN8M-090T
Contents
Restore the Yocto Linux via Linux host PC to the EBOX-IMX8MM
Tools you need before restoring the image to the eMMC:
- Recovery image with the UUU burning software:
- A 64-bit Linux host O/S on a PC (The virtual machine is not suggested to be used)
- USB cable CABLE-MINIDIN8P-30 to connect between the host PC and the PN8M-090T.
Write the image to the eMMC on the PN8M-090T
This section will introduce how to write the image to the eMMC on the PN8M-090T step by step.
- Find the SW1 and SW2 on the PN8M-090T and change the setting to Serial Download(developer) Mode according to the photo below:

- Turn on the host PC and unzip the image file in it.
- Connect the USB on CABLE-MINIDIN8P-30 to the host PC, but not connect to the PN8M-090T.

- Open a terminal on the host PC and access the location you’ve put the image file and input “sudo ./uuu uuu.auto” ; you will see “Wait for known USB Device Appear”

- Connect the CABLE-MINIDIN8P-30 to the PN8M-090T, and it will trigger the serial download mode to restore the image from the host PC.

- After the restore process is done, it will show on the host PC as the image below:

- Remove the USB to Micro USB cable on the EBOX-IMX8MM (Power off), and set the SW1 to Internal boot as below.

- Power on the EBOX-IMX8MM and you can see the Yocto Linux booting.

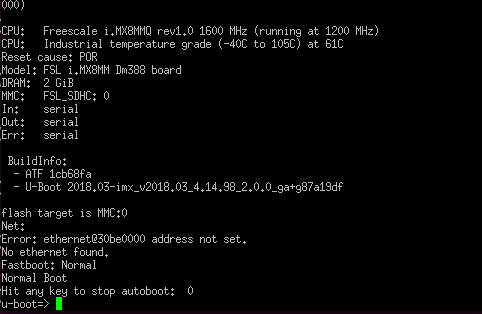
- If you press any key while booting up, we will access the U-boot mode.

Restore the Yocto Linux via Win10 host PC to the PN8M-090T
Tools you need before restoring the image to the eMMC:
- Recovery image with the UUU burning software:
- 2GB RAM version:
- ftp://ppc:ppc@ftp.icop.com.tw/PN8M/OS/YOCTO/Demo%20image/PN8M-090T-2G-YOCTO.zip
- A Windows 10 host O/S on a PC (The virtual machine is not suggested to be used)
- USB cable CABLE-MINIDIN8P-30 to connect between the host PC and the PN8M-090T.
Write the image to the eMMC on the EBOX-IMX8MM.
This section will introduce how to write the image to the eMMC on the EBOX-IMX8MM step by step.
- Find the SW1 and SW2 on the PN8M-090T and change the setting to Serial Download(developer) Mode according to the photo below:
- Turn on the host PC and unzip the image file to it.
- Connect the USB on CABLE-MINIDIN8P-30 to the host PC, but not connect to the PN8M-090T.
- Open a terminal on the host PC and access the location you’ve put the image file and input “uuu.exe uuu.auto” , and you will see “Wait for known USB Device Appear”.

- Connect the CABLE-MINIDIN8P-30 to the PN8M-090T, and it will trigger the serial download mode to restore the image from the host PC.
- After the restore process is done, it will show on the host PC as the image below:

- Remove the CABLE-MINIDIN8P-30 on the PN8M-090T, and set the SW1 and SW2 as the photo below
- Power on the EBOX-IMX8MM and you can see the Yocto Linux booting.
- If you press any key while booting up, we will access the U-boot mode.